How many times have you endured the frustration of exchanging half a dozen email messages when one would have sufficed due to a lack of visual frame of reference for something like a specific element within a website or a piece of print material still in the design stages? Fortunately, one of the most useful skills you can develop to cut through the frustration and get the feedback you need is learning to master the art of the screencap (also known as a screenshot).
Default Device Captures
Most operating systems (OS) and/or devices have some method for capturing still images; unfortunately, there isn’t one method that works across each device but mastering each variation is still a straightforward task.
Windows
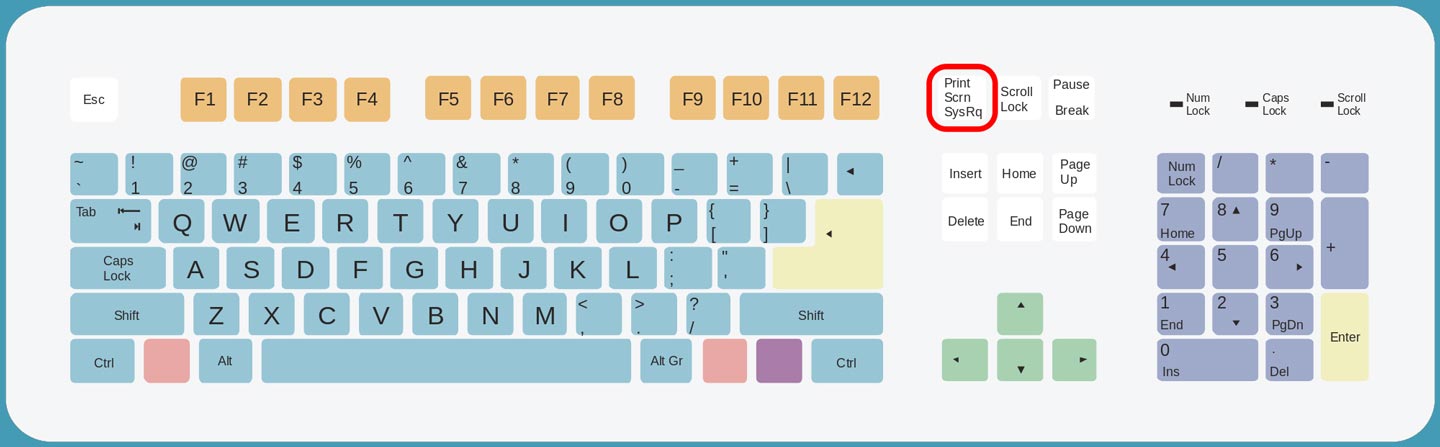
- Full Screen: once the content you want to capture is on the screen, press the Print Screen (PrtScn) key on your keyboard, this saves the image to your clipboard and you can now paste it into a word document, email message, or image editing program. If you’re using Win 8 or higher, use the Windows Key+ Print Screen to automatically save a full-screen screencap within the Screenshots folder of your picture directory
- Active Window: if you don’t need to capture the entire screen, use Alt + Print Screen to capture a single active window.
Windows Phone
These instructions come right from the official Microsoft Support resources.
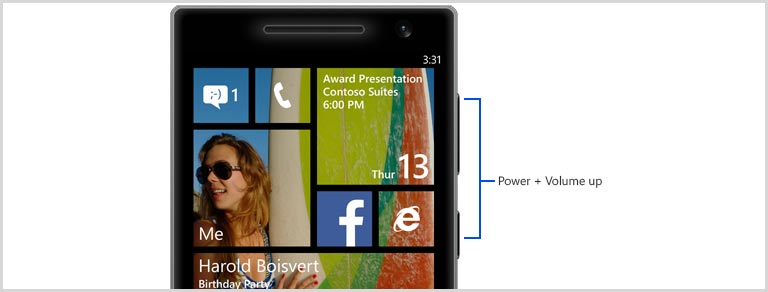
- Windows Phone 8.1: press the Power and Volume Up buttons at the same time to take a picture of your screen which is automatically saved in the Screenshots album in the Photos Hub.
- Windows Phone 8: press and hold Start and Power at the same time.
Mac
These instructions come right from the official Apple Support resources.

- Full Screen: press Command (⌘)-Shift-3. The screenshot is added to your desktop.
- Portion Of Your Screen: press Command (⌘)-Shift-4, and then drag the crosshair pointer to select the area. Hold Shift, Option, or the Space bar while you drag to resize the selection area. To cancel, press Escape (esc) before you release the mouse button.
- Active Window: press Command (⌘)-Shift-4, press the Space bar, move the camera pointer over the window to highlight it, and then click.
- A Menu: click the menu to reveal its contents, then press Command (⌘)-Shift-4 and drag the crosshair pointer over the area. To take a screenshot of the menu without the title, hover over the menu, press Command (⌘)-Shift-4 and the Space bar. To cancel, press Escape (esc) before you click.
iOS (iPhones and iPads)

- Press the Home and Sleep/Wake (power) buttons simultaneously to take a screenshot. Tip: press the power button a moment before pushing the Home button; if you have the volume turned up, you’ll hear a shutter sound in addition to the screen flashing for a moment. You can find the image in your photo library.
Android
When it comes to taking screencaps, Android is a real pain in the neck due to the fact that the process isn’t the same for every device and/or version available. You can check with your device’s provider to see if there’s an inherent method or my advice here is simply take advantage of a third party app solution.

- Go to the Google Play store and search for “screenshot” or screencap” then follow the respective app’s instructions.
The Next Level
After spending some time with screencaps, one of the more common frustrations you’ll encounter is how to capture a screen with content that requires scrolling. To that end, and if you’re not averse to spending some money to make the entire screencap creation, annotating, and sharing process easier, you should consider any of the following options:
Of these options, the one from TechSmith garners consistently high reviews and has been around for several years. Having said that, it is not without its flaws, which include routine scroll capture bugs in Chrome browsers and mediocre technical support (which, ironically, is still better than its competition).

Nexus 4, Nexus 7, Moto G and Moto G2: all work with the Power & Volume Down button!
Just wanted to chime in here with a couple of thoughts: I have owned five or six Android devices, and all of them have done screen shots with either a combination of the up or down volume button and the wake/power button.
Also, if you’re doing any kind of screenshots, you should give Skitch a shot. It’s a free app from the good folks at Evernote. It has handy annotation features, saves your shots to your Evernote notebooks for reuse, exports a bunch of different formats, and works across lots of platforms. It also solves a big problem of using screenshots on my retina MacBook Pro. The really high pixel density makes for *enormous* screenshots. You can tell Skitch to export all your stuff at normal (72 dpi, for you nerds) screen resolutions.
Out of curiosity, were any of your Android devices running on Verizon?
Yes. All the phones were. My tablets were all wifi-only, though.
Interesting, all of my Android phones (Samsung Galaxies) wouldn’t take screencaps that way. Granted, they have always been using the stock OS and were not rooted.