Now that you have your Google Search Console (GSC) account created, you’re ready to get cracking on must-have settings and configurations.
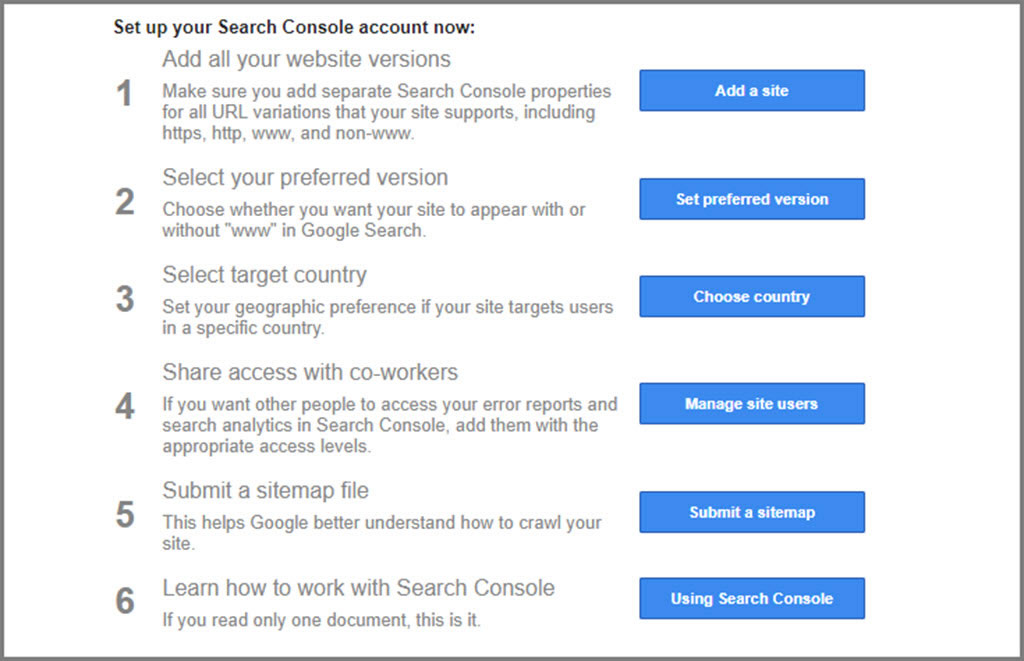
Immediately after your account is verified, you’ll notice a message in the site’s “Messages” dashboard. It’s an automatic message from Google and although it might seem like one of those obligatory “thanks for signing up” notes, it points out some critical next-steps you’ll need to complete.
The most efficient way to get through these tasks is completing them in the following order.
Select A Target Country
You can access this admin panel directly from Google’s message, just select the “Choose Country” button and you’ll go right to that page, but you can also go to “Search Traffic > International Targeting” from the navigation menu.
- Access the admin panel via the message link or nav menu.
- Select the “Country” tab.
- Check the target users option and select the desired country from the dropdown list.
- Save.
Share Access With Co-Workers
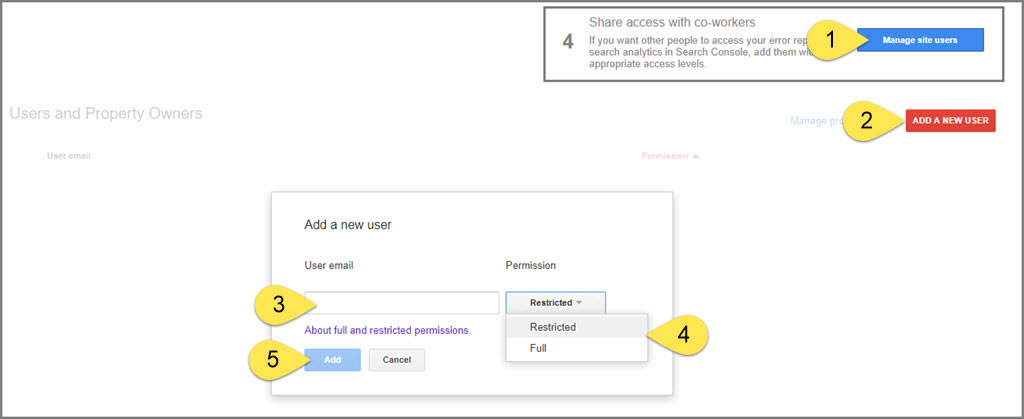
- Access the admin panel via the message link.
- Select “Add A New User” button.
- Add the user email address (you can add additional users by repeating the process).
- Assign Restricted (view only) or Full (view and edit) access.
- Select the “Add” button.
In addition to employees, it is common to provide a user account to your web and IT providers.
Add All Your Website Versions
This is the first item that will include several steps. By the end, you’ll create a new property for each version of your website; and by version, we mean URL variation. For most websites this includes:
- non-www version
- www version
If your website uses a SSL certificate, you’ll need to create two additional versions:
- http (non-SSL enabled)
- https (SSL enabled)
In the end, you may need to create as many as four properties per website. For example:
- https://artshacker.com
- https://artshacker.com
- https://www.artshacker.com
- https://www.artshacker.com
When we talk about creating a property, that is the process we used from Part 1 in this series. You’ll be repeating those steps for each of those variations.
- Selecting the “Add A Site” button via the message link will take you to the first step in the process from Part 1. Although this may seem like a lot of work, it will go quickly thanks to your newly acquired experience from setting up the initial site.
Select Your Preferred Version
- Select the “Set Preferred Version” button via the message link.
- Select either the www or non-www version to use as the preferred version.
Although I recommend using the non-www version of your site as the primary view, it isn’t required. If you already have the www version set as primary at Google Analytics and all of your existing social media and Ad Words campaigns, be sure to continue using it here.
Note: if you thought you could skip setting up properties in the previous step, you’ll likely end up generating the following warning message after selecting a preferred domain:
If all versions are setup and verified, your selection will automatically be applied.
Submit a Sitemap
This process has two steps: running a test then submitting the actual sitemap.
Step 1: Running A Test
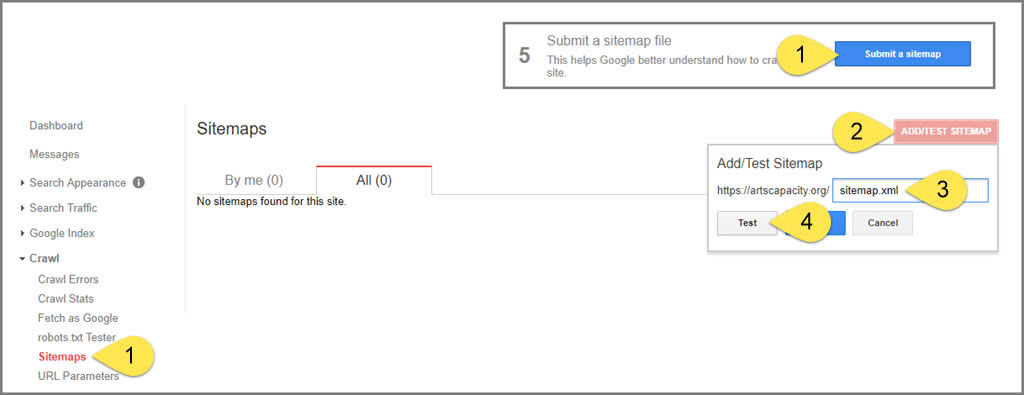
- Select the “Submit A Sitemap” button via the message link or access via the nav menu.
- Select the “Add/Test Sitemap” button.
- Paste the file path of your site’s sitemap.
Note: although /sitemap.xml is quite common, there are numerous variations. As such, you may need help with this step from your web provider as you want to be certain to use the correct file path. - Select the “Test” button.
GSC will display a processing animation and once it’s done, you’ll be able to see the results:
- Select the “View test results” button.
- The page will reload, and you’ll see the results. Ideally, you’ll get a “no errors found” but if the test does produce errors, you’ll need to use that information to address correcting them inside your website’s sitemap. You may need to reach out to your web provider for help troubleshooting and correcting any errors.
Step 2: Submit The Sitemap
Repeat the process used for submitting a test but instead of selecting the “Test” button in step #4, select the “Submit” button.
Select the “reload this page” link and you’ll notice a “pending” status listed, and you can revisit this admin panel after 24 hours to verify all is good.
Looking Ahead
The final installment in this series will show you how to connect the preferred version of your new GSC property to your Google Analytics (GA) account. Allowing GSC to share data with GA is one of the benefits that makes all this work worthwhile!
In the meantime, you might as well begin to enjoy the fruits of your labor so be sure to check out some of ArtsHacker’s terrific articles from the Google Search Console topic category.


