Earlier in the month, I posted an article about how you can use Google Search Console (GSC) to temporarily hide a page from Google Search Results. Several readers wrote in to say that although they could really use that tool, they didn’t have a GSC account set up and when they tried, they gave up after reaching a few frustrating parts of the process. As such, we wanted to create a new series that walks you through the process of setting up a brand new GSC account.
Step 1: Create A GSC Account
You’ll need an existing Google account and if possible, you’ll want to use the one which is set up as an admin with full read/write privileges at your site’s Google Analytics (GA) account. Go to the GSC homepage and sign in if needed. If you’re already signed in, you’ll go right to Step 2.
Step 2: Add A Property
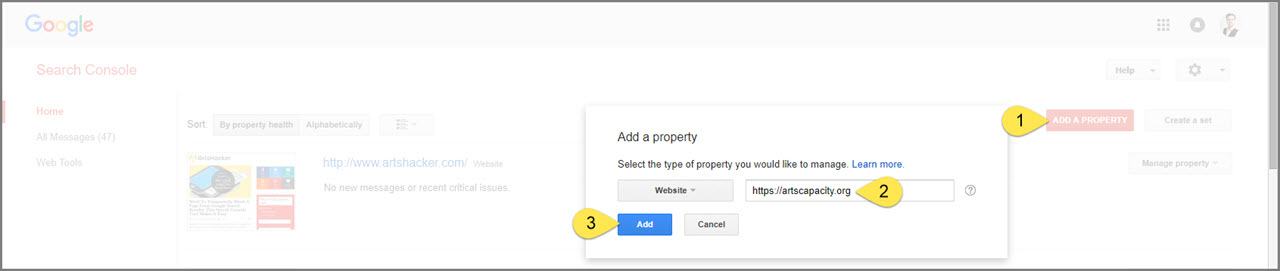
- Select “Add a Property” button.
- Make sure “website” is selected and enter the primary URL for your site.
- Important: make sure you use the full URL for your primary domain. The part you want to pay close attention to is whether that URL uses a https or http prefix (hopefully the former) and whether you use the www or non-www version. There’s no “correct” answer inasmuch as making sure you use the one that displays when you visit your site’s homepage. For example, https://www.yoursitename.org is not the same thing for this purpose as https://yoursitename.org.
- Select “Add” button.
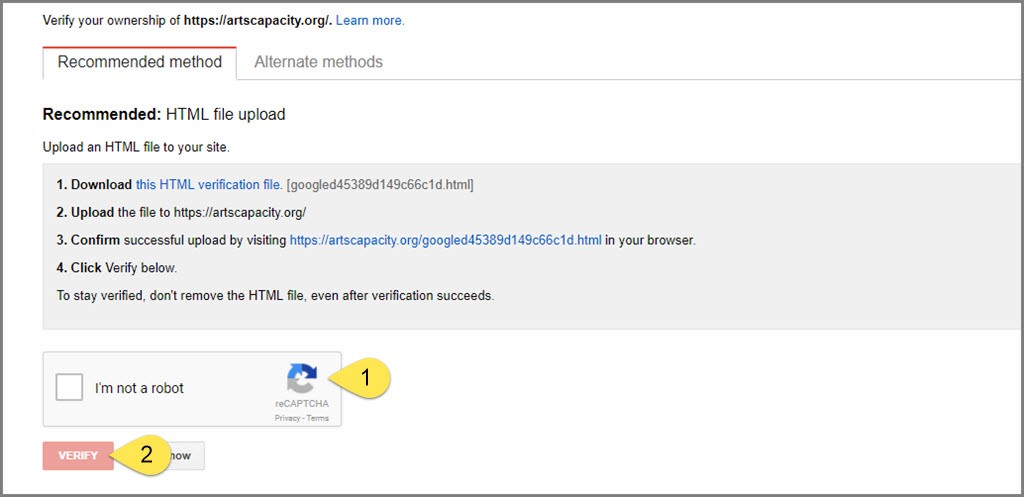
Step 3: Verify Website Ownership
This is the first hurdle where users get stuck on. There are two options for confirming your site ownership here and you’ll need to complete: the recommended method and four alternate methods. Each option will require some degree of access to the root directory of your website, the login and password to your domain registrar, or the ability to add code to your website’s templates.
If you know you can’t complete any of these tasks, you’ll need to reach out to your web developer or domain registrar provider. Based on my experience, one of the most reliable methods is the Domain name provider option, having said that, the process with the least steps is the “Recommended” option.
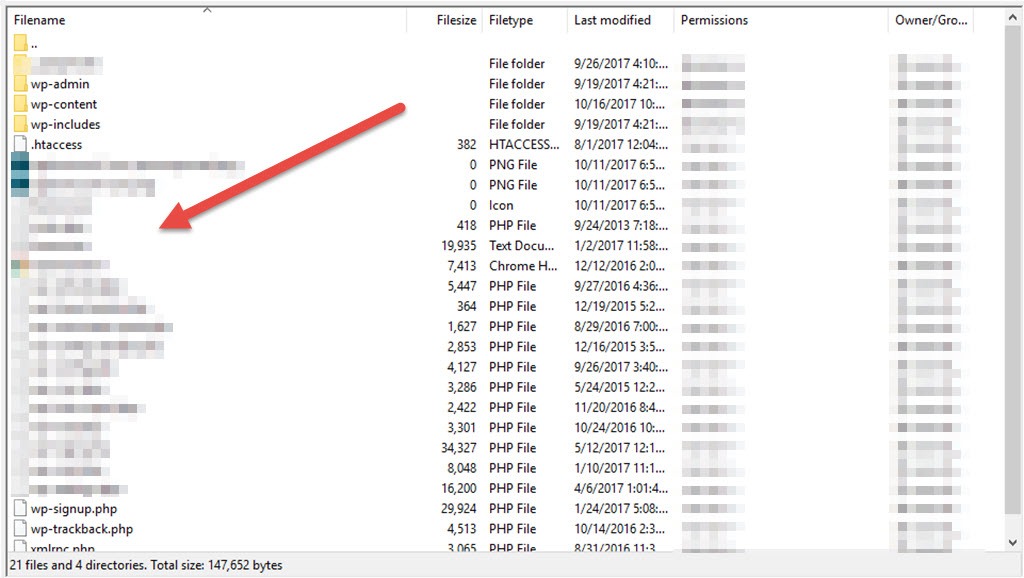
Google’s instructions here are super clear and if you’re using an FTP program (like Filezilla) to access your site, you’ll want to make sure you place the verification file in the root directory.
If you’re using WordPress, that would be the highest-level directory available; you’ll see some directories (i.e. folders) labeled “wp-content, wp-admin, and wp-includes. Upload the verification file here so it appears alongside the other individual files, such as the .htaccess, wp-signup.php, and wp-trackback.php files.
Once that file is uploaded (or your provider confirms that task is complete):
- Return to the GSC dashboard and select the “I’m not a robot” captcha and complete the captcha task.
- Select “Verify.”
If all is good, you’ll get the following confirmation message:

Congratulations, you’ve successfully created a GSC property for your website and verified that exists in the eyes of Google!
You deserve a break.
Check back in for our next installment where we’ll take a deep dive into completing must-have settings and configurations along with connecting the site to your Google Analytics account.
[box]
Step 3-Alt: Verify Using The Domain Name Provider Option
Although the Google recommended version will work out fine, I tend to prefer using the Domain Name Provider option. This process will almost certainly take more time, but you’ll make up that difference in the long run thanks to being a more reliable method because you don’t have to worry about that verification file getting accidentally removed or deleted. It also precludes needing to use an FTP program to upload files.
The only thing you’ll need is access to the Domain Name System (DNS) records for your primary domain name. This is typically accessible via a Domain Name Provider (i.e. domain registrar) admin panel.
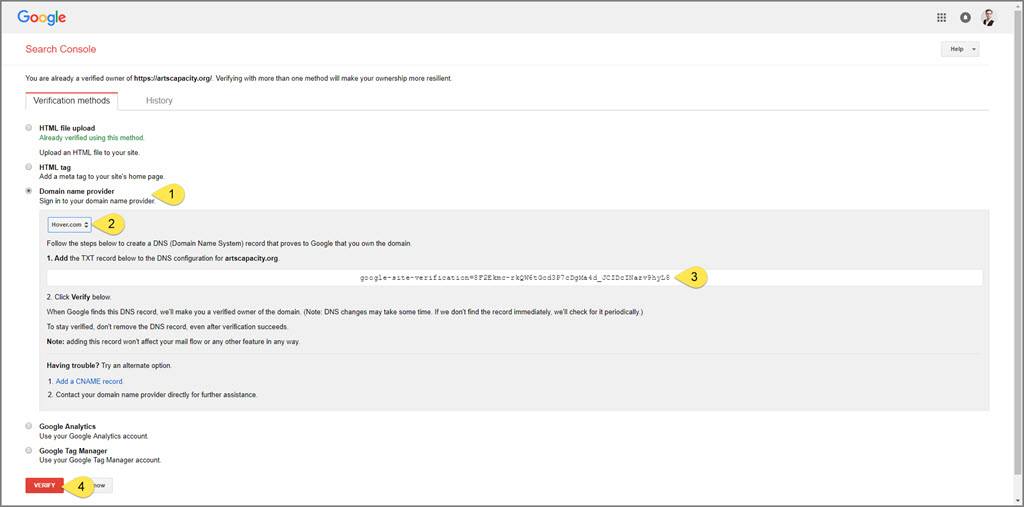
- Select the “Domain name provider” option. A list of additional instructions will toggle open.
- Select your domain name provider from the dropdown list (odds are, your provider will be listed, if not, go ahead and use a different method to verify).
- Copy that TXT record value, log into your domain provider admin panel, and create a new TXT record using that value (see below).
- Select “Verify” and if all is good, you’ll get the same confirmation message referenced above.
Creating The TXT Record
For this example, I’m using the admin panel at my preferred domain registrar, Hover.com. The method for creating a DNS record at your registrar may be very different and you’ll need to reference their documentation if any questions arise.
Add a new DNS record, making sure it is a TXT record.
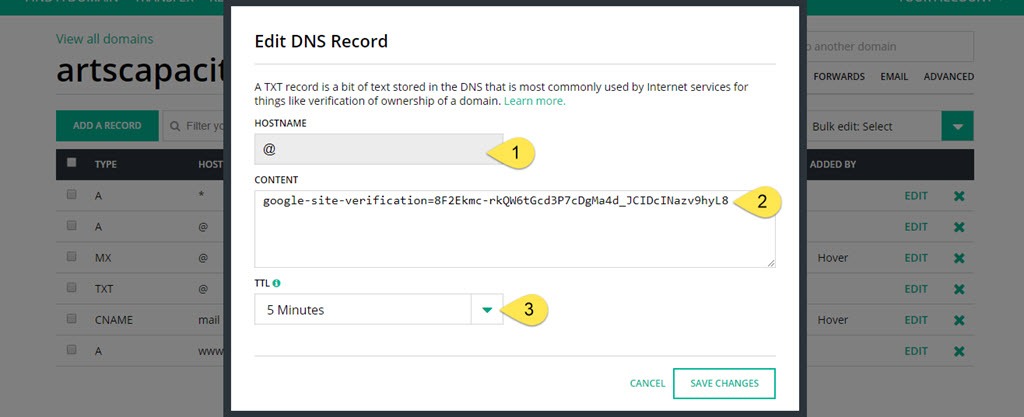
- The hostname should be the “@” character.
- In the content/value field, paste the verification string you copied above in step 3.
- If you can set the TTL (time to live) value, select a low value. This is approximately how long it will take the new TXT record to be recognized by Google.
[/box]
Looking Ahead
Although setting up your account is the first crucial step, it isn’t the last. Upcoming installments will cover:
- Connecting the property to Google Analytics
- Submitting All Versions Of Your Site (yes, you have multiple versions of your site; who knew, right?)
- Setting the site’s primary version
- Submitting sitemap(s)
HELP, I’M STILL OVERWHELMED!
That’s okay. There’s nothing wrong with asking for help. In this case, you may need to contact a few of your providers in order to get everything in place. For example, your web developer or web host can help with getting the verification file uploaded to your root directory and your domain registrar can help create a new DNS record. If you use a provider for your Google Analytics work, you can ask them for help as well.
You can also feel free to post questions as a comment but know that although we can not provide direct technical support, we’ll do our best to be as helpful as we can.
Thank you for the authoritative read on this issue. To me, being able to actually see the icon in the…