At the heart of a website is its database. Different publishing platforms will opt for one database format over another but this installment will focus on the MySQL database management system as used inside a WordPress environment.
Although most of the optimization tasks we’ll be reviewing rely on running SQL queries, we’re also include a list of WordPress plugin resources you can use for implementing some of these tasks. The good news there is none of them require you accessing the database directly.
[box type=”alert” icon=”none”]AN IMPORTANT DISCLAIMER: editing your database is not an insignificant task. You can go from running fine to all mucked up in no time at all. As such, be sure to make a backup of your site files and the database before following any of these instructions. Better still, practice on a staging or sandbox environment before implementing on your live site. If anything goes awry, that’s on you.[/box]
1. Cleaning Up The wp_options Table
One of the best features about WordPress is the enormous repository of free and freemium plugins that offer a dizzying array of features and functionality. Having said that, some of those plugins come with a good deal of baggage in the form of excessive autoloaded data (data that gets loaded on all pages regardless if its used). This is often called expired data.
If you deactivate or uninstall the plugin, that doesn’t mean the data goes away. For many of these plugins and themes, autoloaded data often remains behind and most of that baggage ends up inside the wp_options table.
Over time, those plugins and themes end up dumping hundreds of extra rows of autoloaded data, so even if you’re on a higher end server, this database bloat can slow your site down to a crawl.
[box]PRO TIP: a High Time to First Byte result on page load speed tests is a good indication you may have excess autoloaded data. We examined what High Time to First Byte are and how to discover them in the Establishing Speed And Performance Benchmarks installment from this series.[/box]
Find Autoloaded Data And Delete Expired Data Manually

- From your phpMyAdmin panel, select your database from the list in the left navigation sidebar.
- Select the SQL tab.
- Enter the following query then select the “go” button
SELECT * FROM `wp_options` WHERE `autoload` = 'yes'
The resulting list will include all the autoloaded data rows.
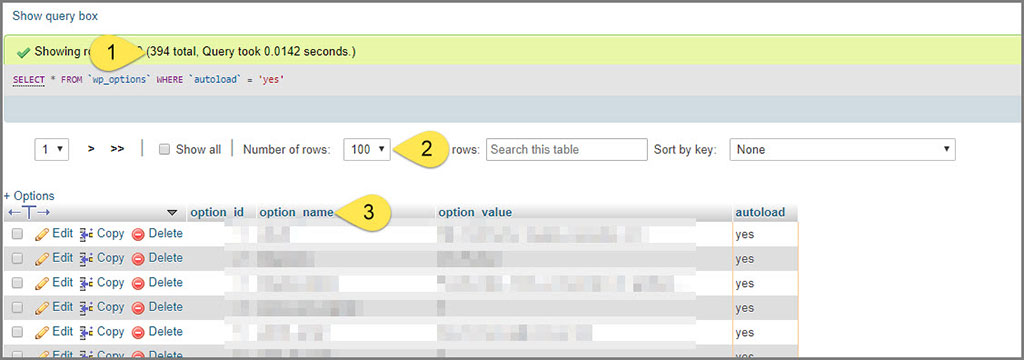
- Take note of the total number of rows as you’ll use this later to help measure improvements after you finish weeding out expired data.
- If you have more than 99 rows, do yourself a favor and set the display number to the highest available (probably 500). The page will reload when you do.
- Select the “option_name” column header, the page will reload. This will arrange the rows in alphabetical order which makes it easier to identify and keep track of them throughout the next steps.
What you’re looking for are rows that have names of plugins or themes you no longer use. Granted, this isn’t always self-evident since some developers use cryptic names but in many cases, it won’t be too difficult to figure out. FYI, there’s no sort of timestamp as to when a row was last accessed so you’ll have to rely on a combination of memory and Google searches.
In this example, I’m looking for any expired data from “Jetpack,” a popular plugin known for adding autoloaded data to the wp_options table.

- I found this group of rows that that have “jetpack” in the option name.
- If there aren’t that many (say, less than a dozen) you can delete them one by one using the “Delete” link (select “OK” in the subsequent confirmation box)
- You can also delete them all at the same time by checking them off them selecting the “Delete” command at the bottom of the table list.
Removing Expired Data Using a Delete Query
Let’s say you already know a keyword in the autoloaded row option name and want to skip right to the manual search and destroy process. No problem, there are queries you can use for the exact purpose.
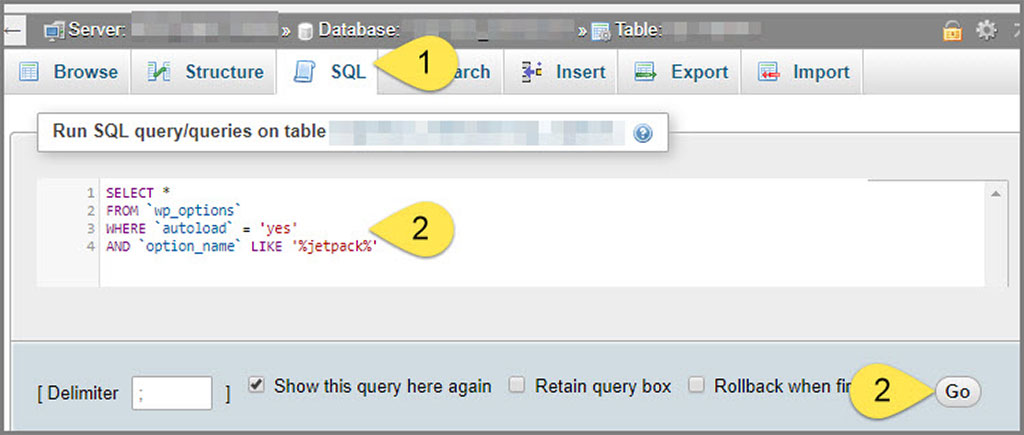
- Select the SQL tab.
- Paste the following query then select the “go” button.
Note: don’t forget to replace “jetpack” with whatever term you need to use.
SELECT *
FROM `wp_options`
WHERE `autoload` = 'yes'
AND `option_name` LIKE '%jetpack%'
Once the results load, you’ll see all autoloaded rows from the wp_options table with the term as part of the option name.
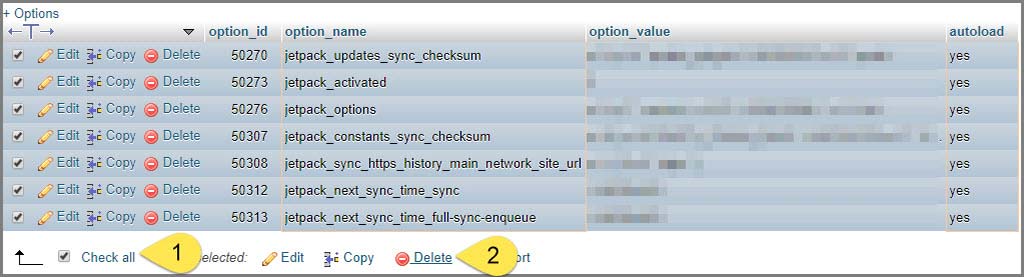
From here, you can confirm all the rows are what you want to delete, select “check all” at the bottom of the result table, then select the “Delete.”
[box]PRO TIP: if you’re feeling especially confident about the expired data you want to delete, you can replace “SELECT” with “DELETE” in the previous query. While this is a huge time saver, you should be certain what you’re doing before using it.[/box]
When you’re all done, go back to the SQL tab and query the autoloaded data again to compare the new lower number to where you started.
WordPress Multisite Considerations
If you’re using WordPress Multisite, know that it creates mutually exclusive database tables per install. As such, let’s say you had Jetpack running on two of your three installs; your primary site and a secondary install. In that scenario, you’ll need to repeat the above steps for each secondary database “wp_options” table.
Each secondary install adds a numeric value to the respective database tables, so instead of the “wp_options” table, you’re now looking through the “wp_3_options” table.
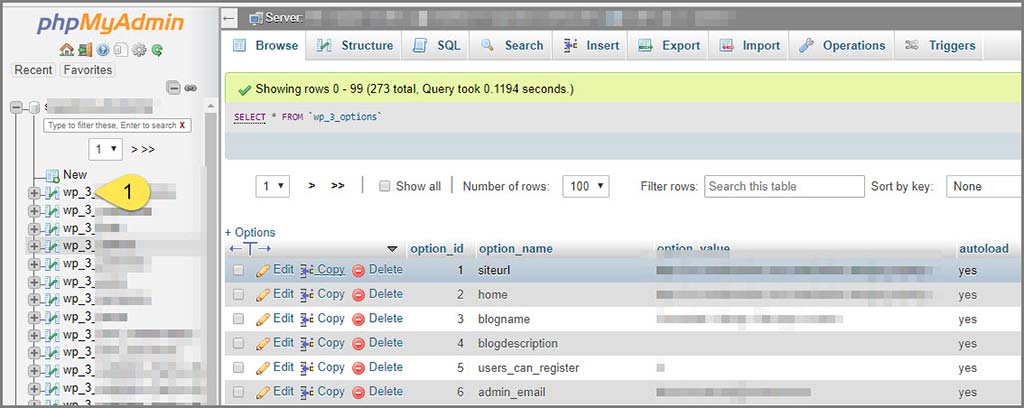
The good news here is you can run the very same shortcut queries to find and remove expired data, you’ll just need to include the additional numeric value to the code.
SELECT *
FROM `wp_3_options`
WHERE `autoload` = 'yes'
AND `option_name` LIKE '%jetpack%'
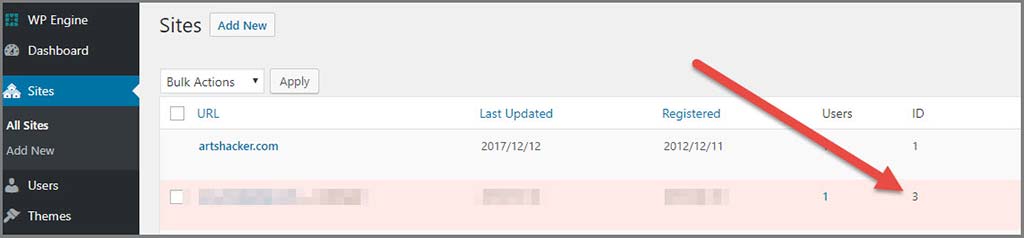
If you aren’t certain which number applies to which secondary site, go to the Network Administrator’s “Sites” admin panel and the ID value will match the database numeric value.
Removing Transients
In addition to clearing out expired data, you’ll also want to clean up transient data, which are temporary autoloaded rows that usually have expiration dates. Sometimes, those rows aren’t removed as intended and there are conditions where you could end up with a bunch of expired transients that hang around.
Deleting these tag-along transients is pretty easy and nearly the same as the other procedures. First, use the following query to find and isolate them:
SELECT *
FROM `wp_options`
WHERE `autoload` = 'yes'
AND `option_name` LIKE '%transient%'
You can then follow the same steps above for deleting them.
In the end, if you aren’t certain an expired transient should be deleted, just leave it.
2. Cleaning Up Orphaned Data
Since the WordPress uses a relational database structure, you can sometimes end up with what’s known as orphaned data, or bits of data related to a post or comment that no longer exists inside the site. You’ll end up running this process for postmeta and commentmeta.
Postmeta
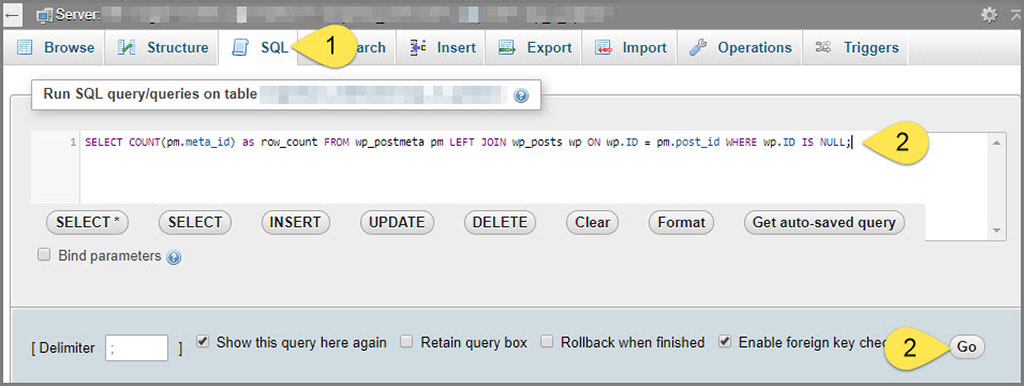
- Select the SQL tab.
- Paste the following query then select the “go” button.
SELECT COUNT(pm.meta_id) as row_count FROM wp_postmeta pm LEFT JOIN wp_posts wp ON wp.ID = pm.post_id WHERE wp.ID IS NULL;
If the results produce some hits, go ahead and delete it by running the following query from the SQL tab:
DELETE pm FROM wp_postmeta pm LEFT JOIN wp_posts wp ON wp.ID = pm.post_id WHERE wp.ID IS NULL;
Commentmeta
Checking for orphaned commentmeta:
SELECT COUNT(*) as row_count FROM wp_commentmeta WHERE comment_id NOT IN (SELECT comment_id FROM wp_comments);
If you get results, delete:
DELETE FROM wp_commentmeta WHERE comment_id NOT IN (SELECT comment_id FROM wp_comments);
[box]PRO TIP: if you’re running WordPress multisite, don’t forget to repeat the process for each install table in your database; i.e. “wp_comments” would become “wp_3_comments” etc.[/box]
3. Optimizing Tables
We saved the easiest task for last. Optimizing your tables is a good thing to do from time to time as it reorganizes the physical storage of table data and associated index data, to reduce storage space and improve I/O efficiency when accessing the table.
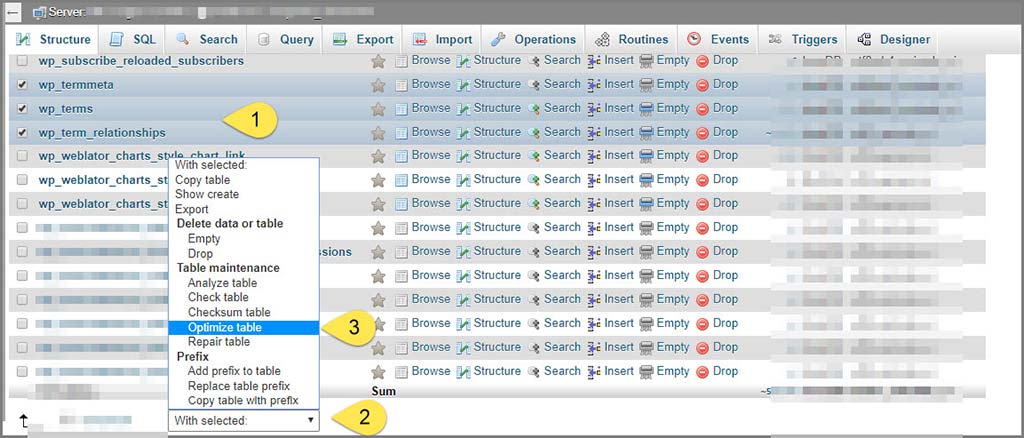
- After choosing which database to work with from left navigation sidebar, select and select the checkboxes next to the tables you want to optimize.
- At the bottom of the table, select the dropdownmenu
- Choose “Optimize” option.
When the screen reloads, you’ll see the confirmation messages along with any notices about tables that do not support the optimize command (no big deal).
4. WordPress Plugin Options
Given how much positive impact optimizing your database has on overall site performance, you shouldn’t be surprised to find several Plugin solutions.
These are terrific solutions for those who aren’t comfortable working inside the database or if you don’t have access. Keep in mind, you can still muck up your database with these solutions so be sure to make backups of your site and database before using.
Keep in mind, some of these plugins may be disallowed by your host (due to how much damage they can cause if used improperly). If you aren’t sure, contact the host before installing them.
[box]
WP-Optimize
This plugin works to de-fragment MySQL tables as well as remove data like pingbacks, trashed comments, expired transient options, post revisions, etc.
The plugin offers control over which areas of your database you want to optimize plus you can run tasks manually or schedule them as desired.
[button bg_color=”#449bb5″ border=”#449bb5″ link=”https://wordpress.org/plugins/wp-optimize/”]Download from the WordPress Repository[/button]
[/box][box]
Optimize Database after Deleting Revisions
This is one of the more straightforward solutions available. In just one-click, the plugin will work to delete unnecessary data, like trashed posts, spammed comments, unused tags, expired transients, and more. Worth mentioning is this plugin is compatible with WordPress Multisite installs in that it will clean all of the network sites.
[button bg_color=”#449bb5″ border=”#449bb5″ link=”https://wordpress.org/plugins/rvg-optimize-database/”]Download from the WordPress Repository[/button]
[/box][box]
Transients Manager
Although the plugin author describes it as a developer’s tool, it is absolutely something general content managers will find useful if your task is to find and manually delete transients. I don’t recommend attempting to edit them, rather, use the “Delete” action to remove any you know are no longer needed.
[button bg_color=”#449bb5″ border=”#449bb5″ link=”https://wordpress.org/plugins/transients-manager/”]Download from the WordPress Repository[/button]
[/box]
4. Conclusion
Congratulations! You now know how have all the fundamental know-how to jump into the database optimization pool. These skills are something you’ll use on a regular basis as you should be tending to these database optimization tasks at least every six months. If you frequently try out plugins or themes on your live site, you’ll want to step up that schedule.
Database maintenance doesn’t have to be scary nor do you need to have degree level skills to implement these tasks. I hope these instructions help enlighten your outlook and build confidence.
Future installments will cover minification, content delivery networks, and security concerns related to updating plugins and themes. In the end, you’ll be able to use all these skills to improve your site’s page load speeds and have a tool to fight back against potential post net neutrality slowdowns.
Now go take an extra mid-day break, you deserve it.