No need for any backstory here, we’re all well aware of how much COVID-19 is impacting operations and one of the more pressing challenges is communicating organizational announcements to patrons.
Today’s post provides step-by-step instructions on how to quickly create and manage COVID-19 announcements for websites running on WordPress.
Goals
- Provide a single page for all COVID-19 related messages.
- Generate an update RSS feed you can use to push new messages into an automated email marketing campaign.
- Easily remove everything once operations are back to normal.
Step 1: Create A New Post Category
You’ll be using default WordPress posts to generate each new message. To that end, you’ll need to create a dedicated COVID-19 post category.

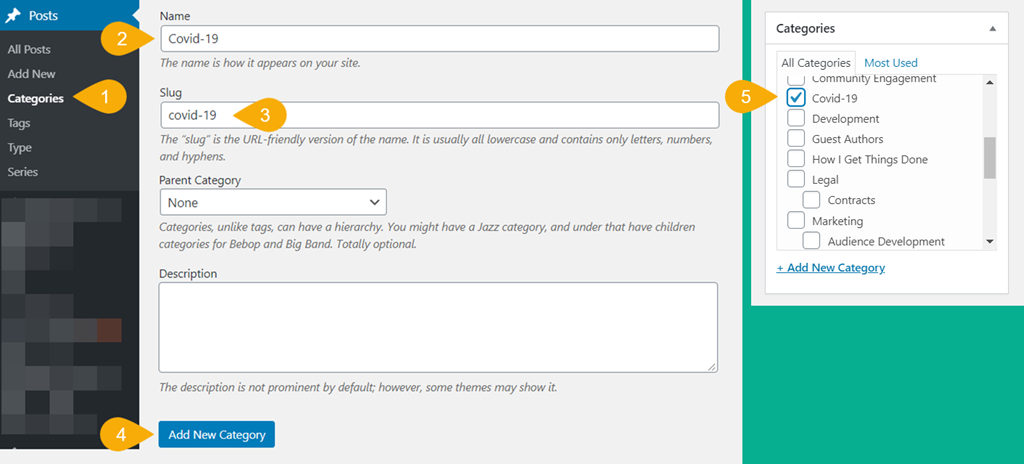
- Go to Posts > Categories.
- Enter Covid-19 or something similar for the category name.
- WordPress will auto-generate the slug, but you can customize it if desired.
- Select Add New Category.
- When you create a new post, you will now see the COVID-19 category in the list of checkbox options. Be sure to select it when creating new messages.
You’ll be able to delete this category once it is no longer needed. This can be done by going back to Posts > Categories, hovering over that category in the list to the right of the admin panel then selecting the red Delete link.
Step 2: Create A New Message
You’ll need at least one published message before you can find the RSS feed and have content appear on an index page. Be sure to assign the COVID-19 category to the post before publishing.
Step 3: Create A COVID-19 Index Page
By default, WordPress will create an archive page for every post category. While you can use this as your index page, it will be very limiting in that you won’t be able to add any free form copy to the page.
Instead, I recommend creating a page to use that we will set up to only display posts from the COVID-19 category.

- Go to Pages > Add New.
- Give the page a title and publish.
Keep this page handy as we’ll be coming back to it shortly.
Step 4: Creating A List Of Posts From A Specific Category
This step requires installing a free plugin, WP Show Posts. It is a plugin I highly recommend and comes from a dedicated and talented developer, Tom Usborne.
If you need instructions on how to install a plugin, here’s an excellent guide. If you are unable to install plugins on your site, then you’ll need to revert to using the default post category archive page.
Once you have the plugin installed and activated, you can create a listing.

- Go to WP Show Posts > Add New.
- Enter a title. This is for admin purposes only and will not show on the frontend to site visitors.
- Make sure you’re on the Posts
- Post Type: select Post.
- Taxonomy: select category.
- Terms: Check off the covid-19 category (or whichever category slug you created for these posts).
- Posts per page: enter a number that will handle how ever many posts you think you’ll need. You can always come back to edit this later if needed but I strongly recommend setting a number high enough that all posts show on a single page.

- Go to the Columns
- Columns: select “1.” You can use a column layout, but I recommend keeping thing easy and go with one.
- Columns gutter: use the default 2em. Again, you can edit if desired, but this padding setting will likely work fine.

- Go to the Images
- By default, this option will be checked. Uncheck it. While you can include images, you likely won’t be using any in your posts and tweaking these settings will only add a good bit of time to this process, as such, I recommend against using it for this purpose.

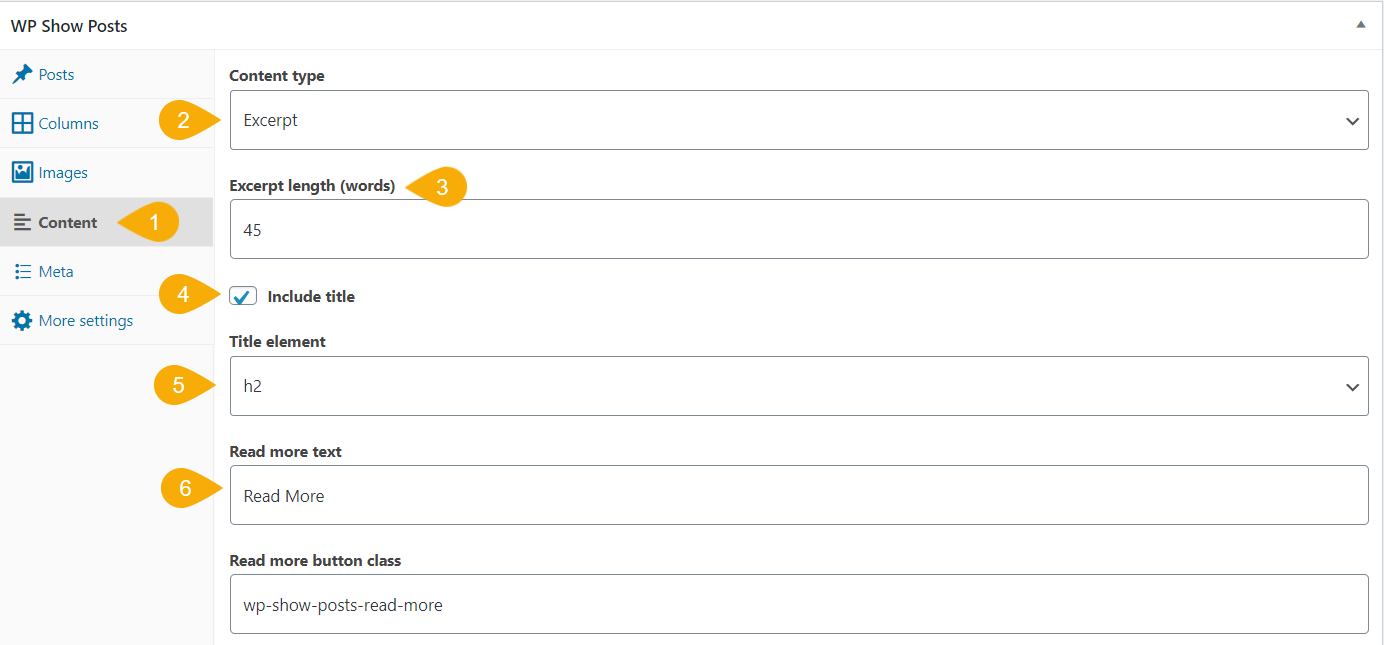
- Go to the Content
- Content type: I recommend using Excerpt but None would work as well if your post titles are very descriptive. You can choose Full to show all the post copy but that will end up creating a very long index page.
- Excerpt Length: if using an excerpt, I find 45 words is a good amount that works nicely in both desktop and mobile configurations, but you can set this value to whatever you find works best.
- Include title: make sure this is checked.
- Title element: the default H2 (Header 2) option is likely fine.
- Read more text: The obligatory Read More works fine but it can be whatever you wish. This will appear as a button below the title and excerpt. If you’re using titles only, I recommend leaving this blank so no button shows (the title will be linked).

- Go to the Meta
- Check Include Date and leave the others unchecked. I can’t imagine a scenario where you need to show the post author, terms are just the categories and tags (neither are necessary in this usage), and you likely don’t want to encourage comments.
- Date location: select Below title.
By default, posts will appear in descending order with the most recent at top. You can edit this in the More settings tab if desired.

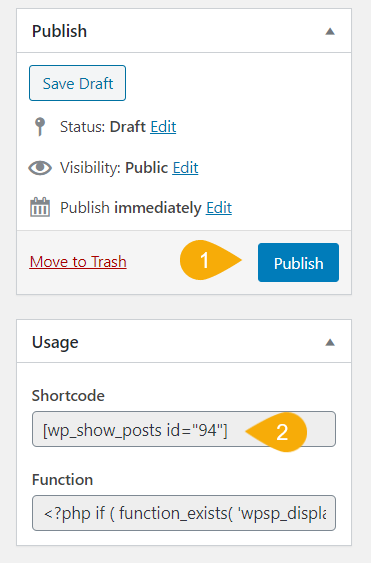
- Publish the post listing.
- When the page reloads, select and copy this shortcode.

- Go back to your COVID-19 index page and paste this shortcode into the content metabox.
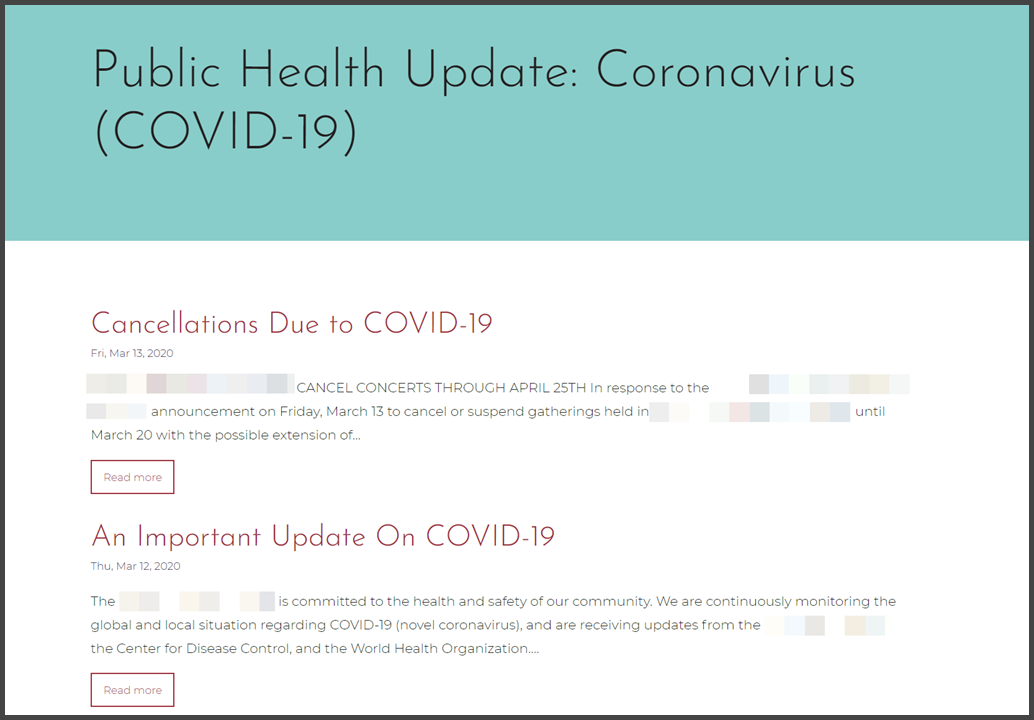
Publish the page and when you view it on the frontend, you’ll now see a list of posts with the COVID-19 category displayed using the settings from the post listing. It should look something like this:

Pro Tips
- While not required, there is a paid pro version of WP Show Posts. It provides a good bit of additional features, not the least of which are custom styling options that will allow you to better match your site’s branding.
- For many of my clients, we’ve been inserting ticket exchange/donate/refund forms and critical box office contact information at the top of the index page, before the post index appears. Some clients are writing appeal language to stress the importance of donating back ticket purchases and additional online donations.
- You can use this same method for indexing announcements posts for stakeholders as well, such as employee and artist notifications.
Finding The COVID-19 Post Category RSS Feed URL
By default, every WordPress post category generates an RSS feed. Finding the URL is very straightforward and requires that slug we mentioned in Step 1.3:
https://yoursitename.org/category/[category slug]/feed
For example, here’s the RSS feed for the “marketing” category here at ArtsHacker:
https://artshacker.com/category/marketing/feed/
Most email marketing platforms will need this URL in order to create an automated campaign that sends list subscribers a message every time a new COVID-19 post is published.
Removing Everything Once Business Normalizes
You likely won’t want to keep all this content up at your site once business returns to normal and removing everything is a snap.
- Delete your COVID-19 index page.
- Delete all your COVID-19 posts.
- Delete the COVID-19 post category (this also deletes the RSS feed).
Free Support
Given how much the COVID019 pandemic is impacting performing arts organizations, my web development firm, Venture Industries Online, is providing free WordPress support to any 501c(3) for any of the tasks included in this post. Requests will be processed on a first come, first serve basis.