Among the wide array of options available for improving page load speeds and server performance, image compression is one of the most important. The best part is regardless your skillset, there are options at your disposal for making improvements.
We’ll be examining both plugin based and direct methods. In most cases, you’ll be able to use one, the other, or both to maximize effectiveness.
1. Manual Image Compression
One of the most common bear traps I see website content managers fall into is not using optimized images. Simply put, using print quality size (yikes!) or non-optimized web safe images will do all sorts of unpleasant things to your page load speed. To add insult to injury, they also increase your server bandwidth usage.
The combination of those items contribute to lower conversion revenue and higher server costs.
Having said that, image optimization is not an exact science. Google…yes even Google…defines image optimization as an art and science in their developer documentation.
Image optimization is both an art and science: an art because there is no one definitive answer for how best to compress an individual image, and a science because there are many well developed techniques and algorithms that can significantly reduce the size of an image. Finding the optimal settings for your image requires careful analysis along many dimensions: format capabilities, content of encoded data, quality, pixel dimensions, and more.
General Image-Editing Software Optimization Settings
Although each image-editing app has its own process for saving optimized images, there are some basic settings you can keep handy to help minimize file size while retaining images that look good for online use. Use as many of these options as your software provides:
- File type: JPG (PNG files will be necessary if the image requires a transparent background)
- Image Quality: 20-40 percent. In most cases, this range will generate great looking web images but in some instances (such as heavy use of gradients) you may need to ratchet it up to 60 percent.
- Resolution: 72 dpi
- Resampling method: bicubic is a solid all-around choice.
Following those specs will produce an image with a file size anywhere from 20kb – 100kb based on the image dimensions. Full width, hero style images will push the upper limits while images inserted into standard page content should occupy the lower half of that range.
Adobe Fireworks
If you’re an Adobe Creative Suite user, you have access to the Fireworks App and if you’re a casual user, you’ve probably never even given it a second thought. If so, you’re missing out on one of the most super-efficient ways to not only optimize images but do so via batch processing.
To get started, make sure all the images you want to process are in the same folder on your hard drive; ideally, that folder will only include those images. Note, this isn’t required but it will save all sorts of time compared to digging them out of multiple locations.
[box]
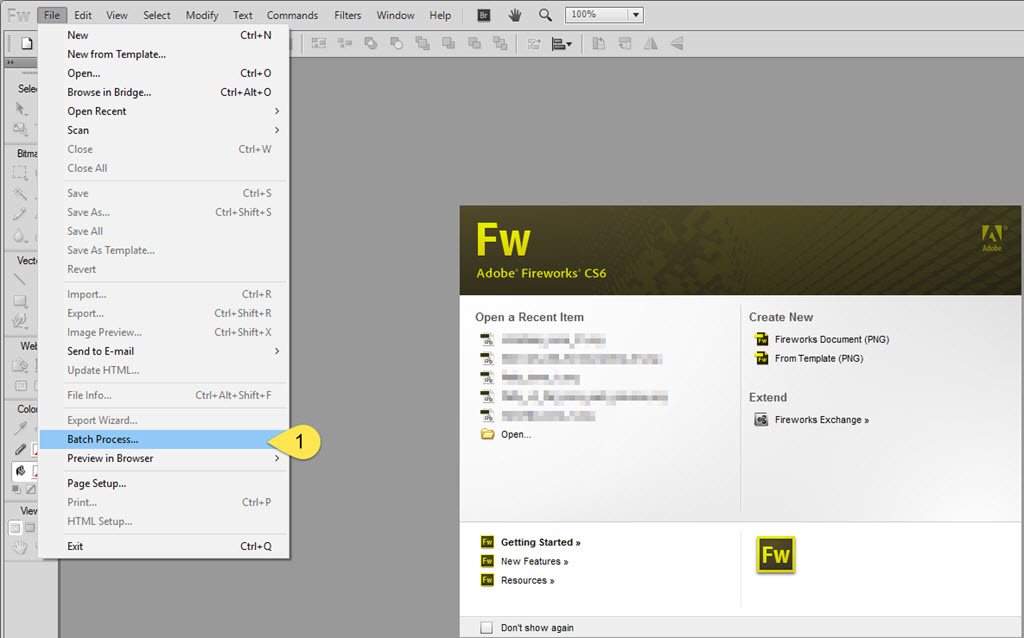
1) Navigate to File > Batch Process.
[/box][box]
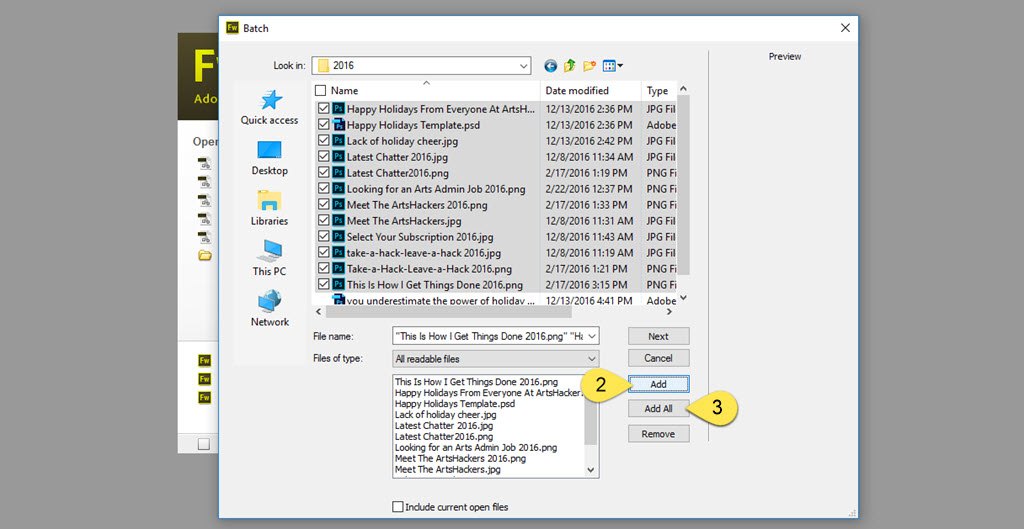
2) Navigate to the folder where the images which need processing, choose files individually, then select the “Add” button.
3) Alternatively, if you already know the folder only includes images that need processing, simply select the “Add All” button.
[/box][box]

4) On the “Batch Process” panel, select the “Export” option and add it to the include window.
[/box][box]
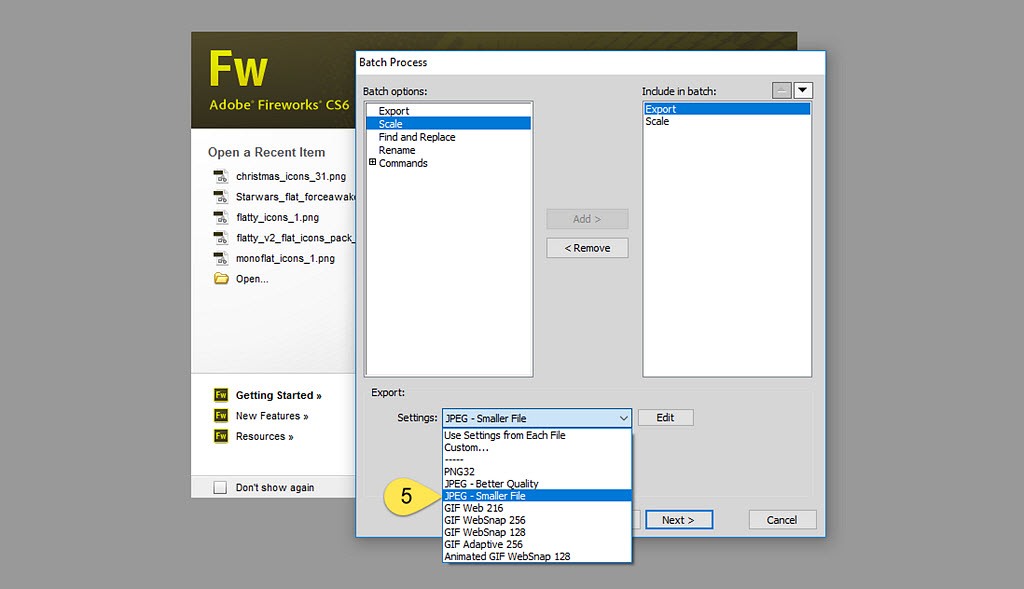
5) From the “Settings” dropdown, you’ll have several ready-made options. The two best suited for web image use are “JPEG – Better Quality” and “JPEG – Smaller File.”
TIP: The latter should suffice for most your needs but when in doubt, you can run the batch twice using each option, compare, then select the version that works best.
[/box][box]
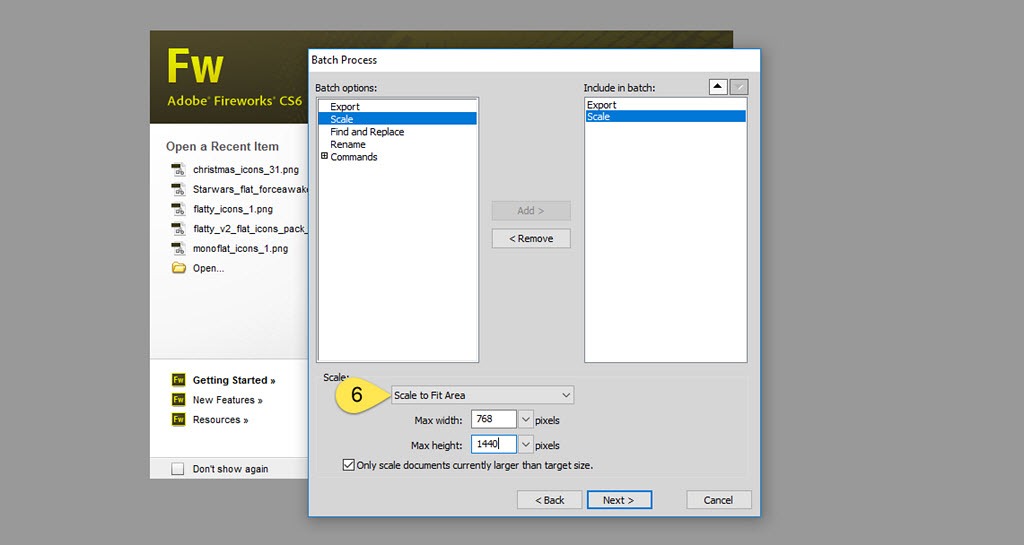
6) On the “Batch Process” panel, select the “Scale” option and add it to the include window. I highly recommend using the “Scale To Fit Area” option, this will resize all the images so they end up with the max width/height settings, thereby providing a group of images with uniform size dimensions per aspect ratio. Select the “Next” button when done.
TIP: This option works best if all the images will ultimately be reduced in size, however, if you know the batch has one or more images equal to or smaller than your target, be sure to select the “Only Scale Documents Currently Larger Than Target Size” option. This will prevent Fireworks from enlarging small images, which usually results in an unsuitable blurry and pixelated final image.
[/box][box]
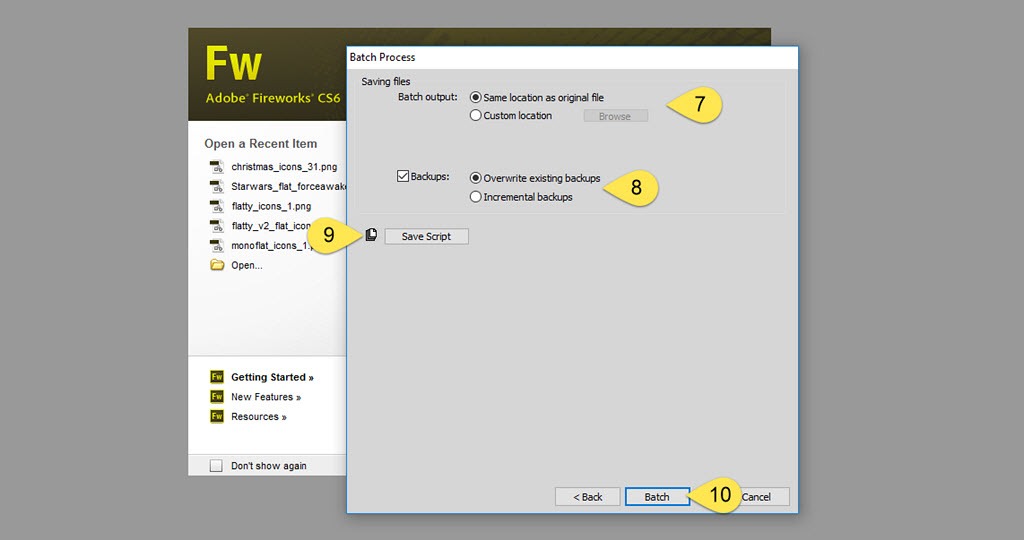
7) Batch Output: save the processed images in the same folder or select a custom location.
8) Backups: I highly recommend using this option and when selected, it will create a new folder inside the output target folder where the original version of each image will be stored. In most cases, selecting the “Overwrite Existing Backups” option will do. If you plan on running multiple versions of the same batch, select “Incremental Backups” to keep copies of the previous batch outputs.
9) Save Script: optional but a good idea if you plan on using the script later. If you’re resizing images to a frequently used dimension at your website, it’s a good idea to save the script so you can render steps 2 – 6 moot.
10) Select “Batch” and let Fireworks do its magic.
[/box]
2. WordPress Plugin Solutions
Even if you don’t have access to quality image-editing software, there are a few options at your disposal capable of getting you as close to the bullseye of image optimization as possible.
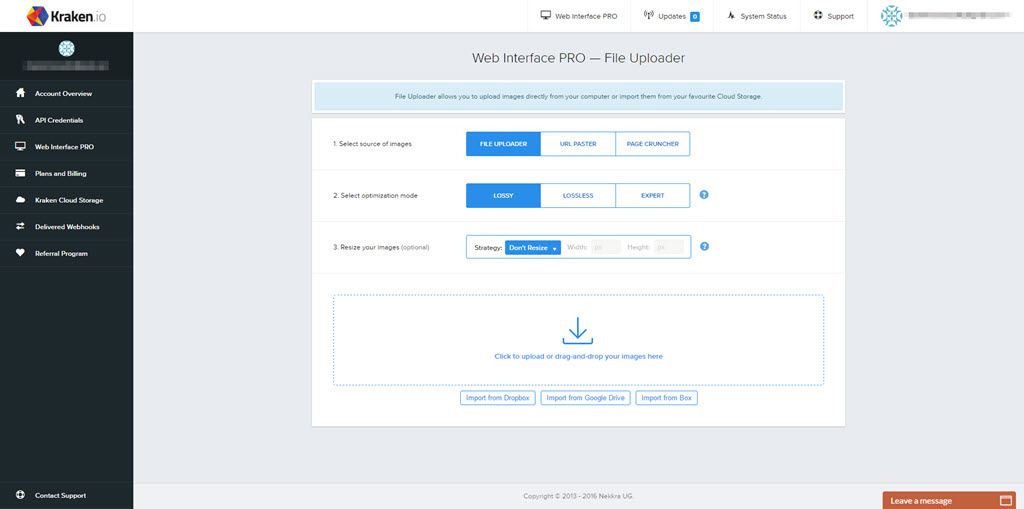
Kraken.io
Regardless of which web publishing platform you use, kraken.io provides a simple to use, free version of their image optimization service accessible. The easy to use interface will not only optimize your images but it can resize them. Uploading images via the web interface can be done directly from your device or Dropbox, Google Drive, and Box.
If you’re a WordPress user, you can integrate your Kraken.io account (free or paid) right into to backend via a free plugin so it automatically optimizes images you upload into pages and posts or you can manually optimize them after the fact in the media library. The plugin doesn’t load up your dashboard with a bunch of funky upsells and does exactly what it promises. What’s not to love? There’s also a free extension for the Magento ecommerce platform.
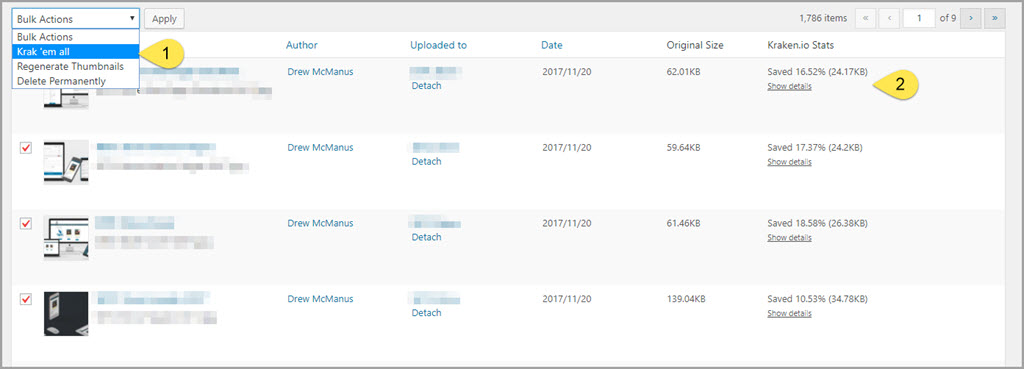
One terrific feature is you can optimize images inside the media library via batch process. This is an enormously handy tool if you already have a number of images already uploaded. Via the media library main admin panel:
- In list view, check the images you want to optimize, then select the “Krak ‘em all” option from the “Bulk Actions” dropdown and let the system do its thing. It will batch process them until finished.
- One an image has been optimized, you’ll see the file size savings in the Kraken.io Stats column. Images that have not been optimized by Kraken will have a one click button to do so.
[box]TIP: one word of caution, make sure you do this during off-peak traffic hours as it will increase your server load. The last thing you want to do is cause your website to freeze right after you send out an email campaign![/box][box]TIP: you’re better off breaking up 50 images into two or three batches than trying to shove them all through at once.[/box][box]TIP: no need to optimize images you know are no longer used on published pages or posts. This only eats up your monthly size allocation for no appreciable gain.[/box]
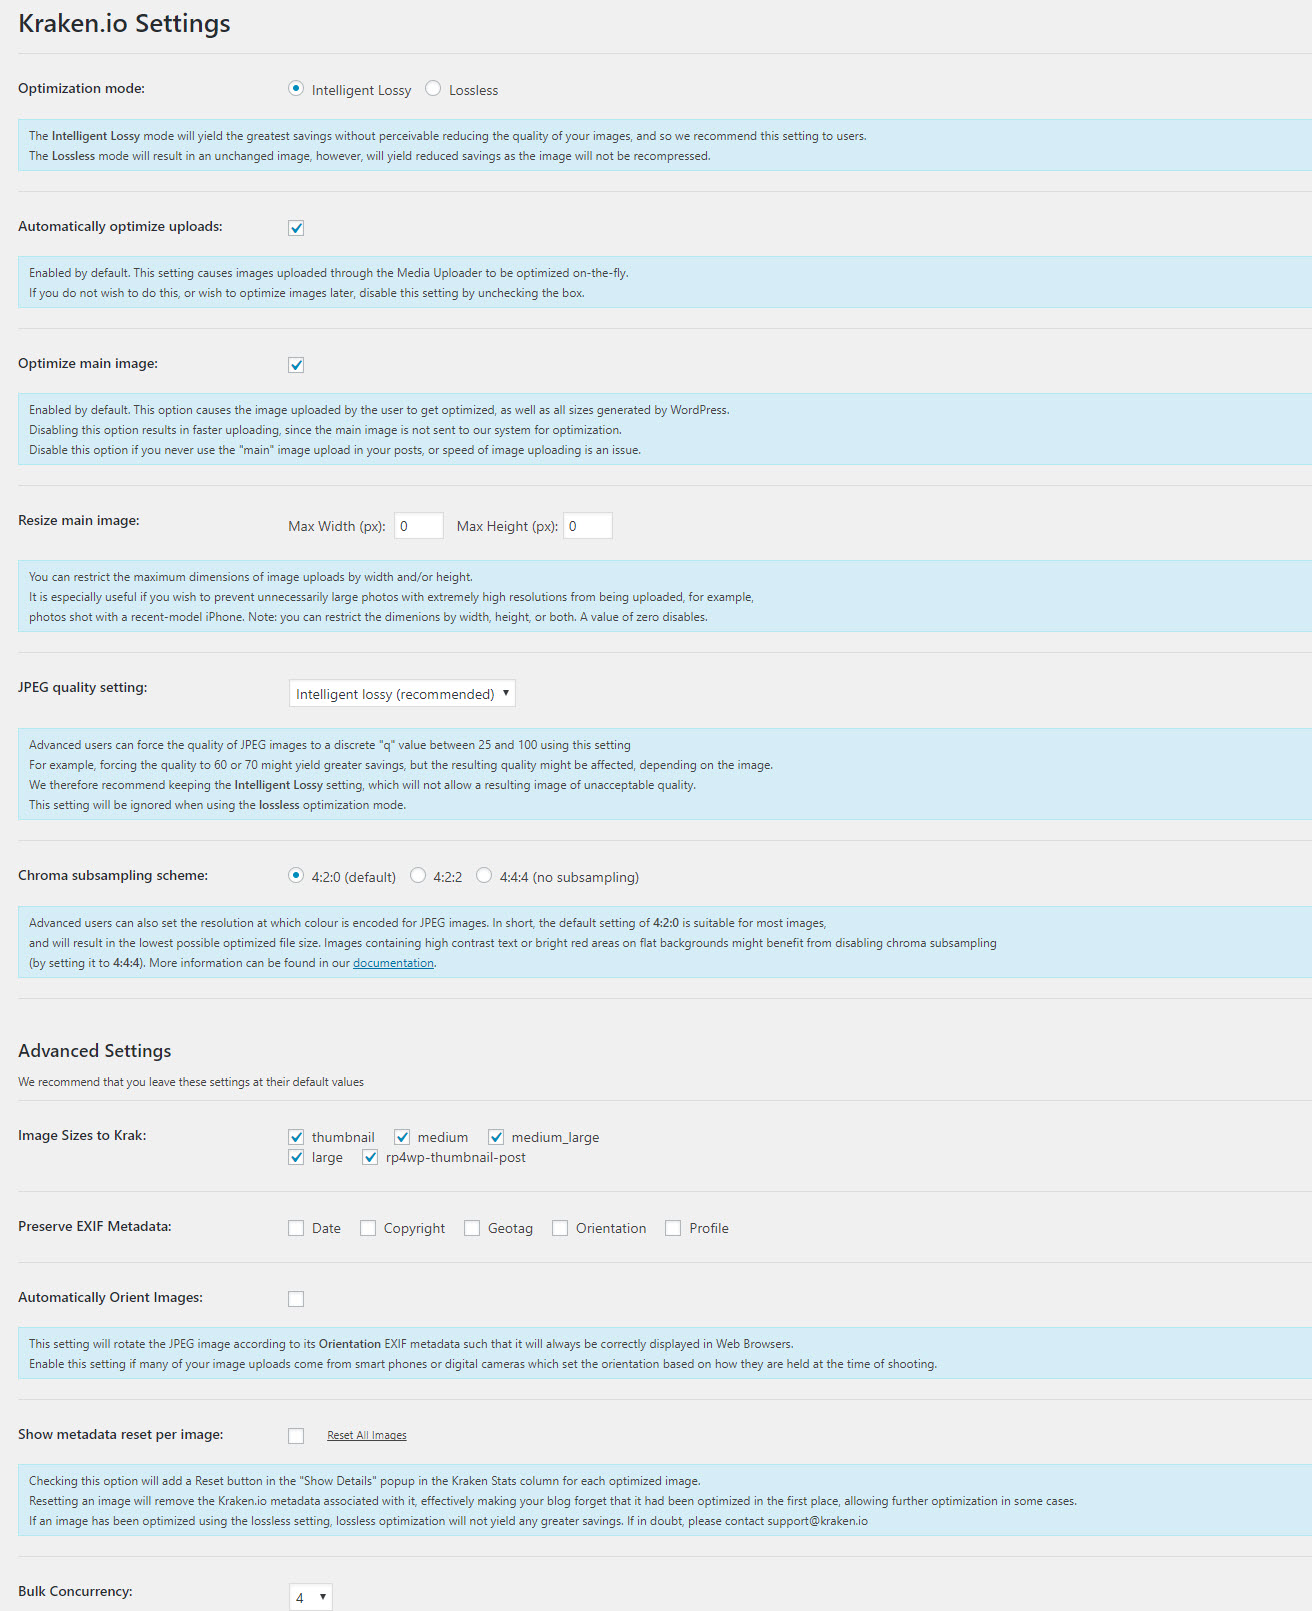
You’ll also find a universal admin panel to control default optimization settings and to determine if WordPress automatically optimizes images when uploading to content or the media library. The letter is super handy but note that it will make the upload process longer. Although you should determine those settings based on your situation, here’s an overview of the settings I typically use (at the time this article was published).
I’ve connected clients who don’t have expensive image editing software or the time/skills to fuss over hundreds of edits over the course of a season with a kraken.io account and in every instance, it made an immediate and positive impact on their page load speeds.
[box]TIP: Even if you optimize images prior to uploading, running them through kraken is still a good idea, just be sure to adjust the default settings so you don’t end up with pixelated looking images.[/box]
Additional Image Compression WordPress Plugin Options
Optimus is a great option that relies on automation and focuses entirely on lossless image compression results. They offer both free and paid versions, and their WordPress plugin is available free from the WordPress repository. The free version does have some limitations that make it tricky to use for anything outside of images inserted into page and post content so if you want to use it for larger hero style images, you’ll need to consider upgrading to a paid plan. Brian Jackson has a superb tutorial from 2016 on how to use Optimus at his how-to site, Woorkup.com.
You can also check out WPSmush, which comes in free and paid versions. It’s comparable in quality to kraken.io although the user interface is a bit chunkier and the free version will absolutely litter your admin panels with upsell nags (yuk!).
If you want one more option, check out Imagify, from WP Rocket. It has some of the most straightforward compression settings that rely on plain English descriptions (normal, aggressive, and ultra). Having said that, you trade that simplicity for the level of control the other options provide. Bonus: its free account has a higher source image file size threshold compared to Optimus, which makes it more useful if you need to compress full width hero images. Like the other options, it offers both free and paid versions.
3. The Animated GIF problem
No doubt about it, animated GIFs are a great way to introduce some motion and humor into your content.
The problem is most of them have huge file sizes.
Mega-huge, as in 1MB and larger. One of the go-to resources, giphy.com, offers an option to use “small” versions but even then, they describe them as “optimized for file size, 2MB or less.”
Ugh.

Fortunately, there’s ezgif.com, a free service that will let you optimize those Animated GIFs. You can optimize source files up to 20MB.
In the following example, you can see the source 1MB GIF was reduced to 422kb.
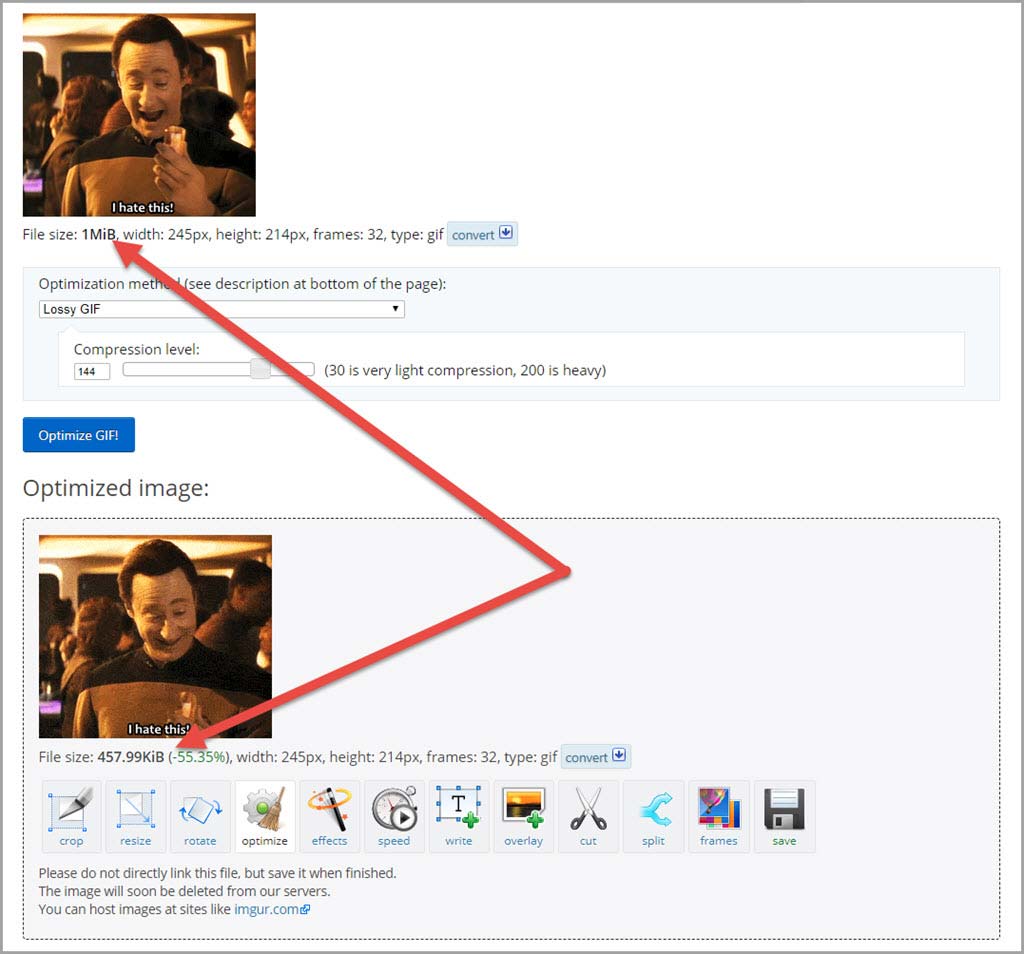
Granted, the result is a noticeable degradation in image quality, so you’ll need to determine an acceptable balance between its value as a content enhancer versus increased page load speed. The GIF above uses the optimized version.
4. Conclusion
Congratulations! You now know how have all the fundamental know-how to master the dark arts of image optimization!
Future installments will cover a wide range of topics, from beginner to advanced skill sets, you can use to improve your site’s page load speeds and have a tool to fight back against potential post net neutrality slowdowns.
Better yet, I can promise you’ll continue to draw on this skill set throughout the length of your career to continuously monitor and tweak your site performance.
Now go take an extra mid-day break, you deserve it.